As a meme enthusiast, I’ve been using a lot of meme generators. Recently my meme workflow is something like:
- Google the image macro name + “generator”
- Click the first hit
- Use the online generator
- paste the image link to Slack
This is obviously not optimal.
So I got excited with the idea of making my own tool. Something that would allow me to type a sentence and get it rendered as a meme !
I didn’t find anything good enough on Github but it seemed python was the way to go, they were almost all written in Python (or PHP, but you know, yikes).
I would usually go for NodeJS, but manipulating images is not its strong suit. So Python it was.
Drawing text in Python
Drawing text in Python is pretty straight-forward:
from PIL import Image
from PIL import ImageFont
from PIL import ImageDraw
img = Image.open("image.jpg")
draw = ImageDraw.Draw(img)
font = ImageFont.truetype("impact.ttf", 52)
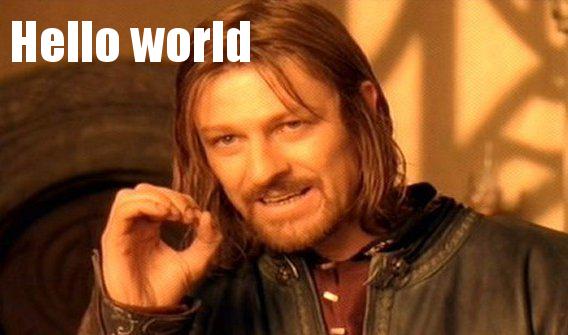
draw.text((10, 10), "Hello world", (255,255,255), font=font)
img.save("out.jpg")
This will print “Hello world” at 10px, 10px on image.jpg and save it as out.jpg:
Nice, but we’re missing a few typical meme caption attributes:
- a black outline
- centered text
The text outline
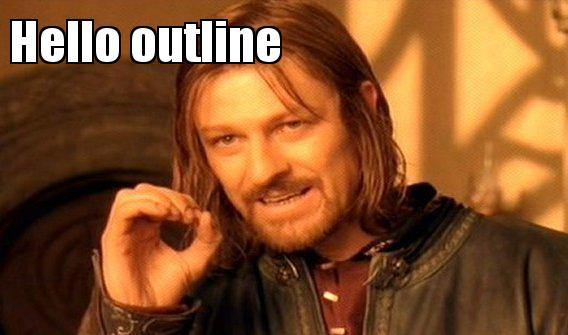
To get an outline, we can use an old trick: draw the text in black first, then lay over the same text in white:
from PIL import Image
from PIL import ImageFont
from PIL import ImageDraw

img = Image.open("image.jpg")
draw = ImageDraw.Draw(img)
font = ImageFont.truetype("impact.ttf", 52)

textX = 10
textY = 10
text = "Hello outline"

draw.text((textX-2, textY-2), text,(0,0,0),font=font)
draw.text((textX+2, textY-2), text,(0,0,0),font=font)
draw.text((textX+2, textY+2), text,(0,0,0),font=font)
draw.text((textX-2, textY+2), text,(0,0,0),font=font)
draw.text((textX, textY), text, (255,255,255), font=font)
img.save("out.jpg")
Center text
To center text, PIL doesn’t help us much: we have to do it by hand. First measure the size of the text, then position it accordingly:
from PIL import Image
from PIL import ImageFont
from PIL import ImageDraw

img = Image.open("image.jpg")
draw = ImageDraw.Draw(img)
font = ImageFont.truetype("impact.ttf", 42)

def drawTextWithOutline(text, x, y):
    draw.text((x-2, y-2), text,(0,0,0),font=font)
    draw.text((x+2, y-2), text,(0,0,0),font=font)
    draw.text((x+2, y+2), text,(0,0,0),font=font)
    draw.text((x-2, y+2), text,(0,0,0),font=font)
    draw.text((x, y), text, (255,255,255), font=font)
    return

text = "Are we centered yet?"
w, h = draw.textsize(text, font) # measure the size the text will take
drawTextWithOutline(text, img.width/2 - w/2, 10)

img.save("out.jpg")

Great! It’s starting to look like a meme. Let’s upper case it all and test with a real sentence:
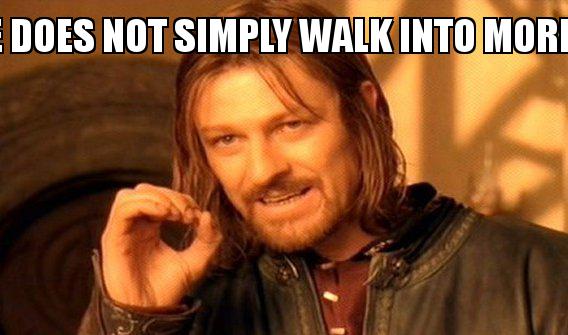
Woops, that doesn’t fit. Unfortunately we’ll have to do this manually again.
Wrapping text
Wrapping centered text is probably the worst. Since PIL doesn’t support centering, we can’t simply add \n here and there and let it render (it would render left-aligned). We have to cut the sentence ourselves into multiple lines, then draw each line separately.
First, let’s find out how many lines we’re going to need:
if w > img.width:
    lineCount = int(round((w / img.width) + 1))

print("lineCount: {}".format(lineCount))
This prints lineCount: 2 for our example. The longer the text, the more lines.
Now that we know how many lines we need, we can create a list of lines:
lines = []
if lineCount > 1:

    lastCut = 0
    isLast = False
    for i in range(0,lineCount):
        if lastCut == 0:
            cut = (len(text) / lineCount) * i
        else:
            cut = lastCut

        if i < lineCount-1:
            nextCut = (len(text) / lineCount) * (i+1)
        else:
            nextCut = len(text)
            isLast = True

        print("cut: {} -> {}".format(cut, nextCut))

        # make sure we don't cut words in half
        if nextCut == len(text) or text[nextCut] == " ":
            print("may cut")
        else:
            print("may not cut")
            while text[nextCut] != " ":
                nextCut += 1
            print("new cut: {}".format(nextCut))

        line = text[cut:nextCut].strip()

        # is line still fitting ?
        w, h = draw.textsize(line, font)
        if not isLast and w > img.width:
            print("overshot")
            nextCut -= 1
            while text[nextCut] != " ":
                nextCut -= 1
            print("new cut: {}".format(nextCut))

        lastCut = nextCut
        lines.append(text[cut:nextCut].strip())

else:
    lines.append(text)

print(lines)
This will output:
lineCount: 2
cut: 0 -> 18
may not cut
new cut: 19
cut: 19 -> 36
may cut
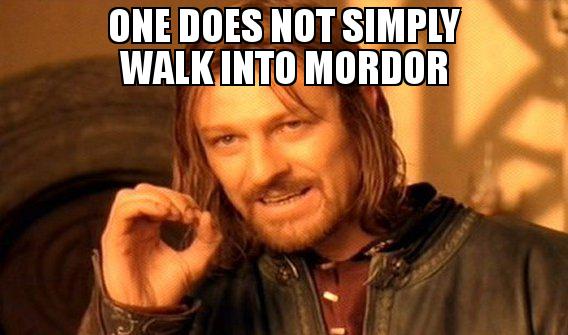
['ONE DOES NOT SIMPLY', 'WALK INTO MORDOR']
What happens is it first try to cut the sentence in half, that would be here:
ONE DOES NOT SIMPL ✄ Y WALK INTO MORDOR
Which is of course not wanted, so the algorithm moves the nextCut to the next space.
But doing this, we might “overshoot”, we might make the first line too long. That’s why we measure the line again and if it is too large, we search for the previous space instead.
Now we can render our lines:
for i in range(0, lineCount):
    w, h = draw.textsize(lines[i], font)
    drawTextWithOutline(lines[i], img.width/2 - w/2, i * h)
One final thing: typically the text is split between the top text and the bottom text. Let’s move it all into a function that can draw centered text (and wrap it) either on top or at the bottom:
def drawText(text, pos):
text = text.upper()
w, h = draw.textsize(text, font) # measure the size the text will take
lineCount = 1
if w > img.width:
lineCount = int(round((w / img.width) + 1))
print("lineCount: {}".format(lineCount))
lines = []
if lineCount > 1:
lastCut = 0
isLast = False
for i in range(0,lineCount):
if lastCut == 0:
cut = (len(text) / lineCount) * i
else:
cut = lastCut
if i < lineCount-1:
nextCut = (len(text) / lineCount) * (i+1)
else:
nextCut = len(text)
isLast = True
print("cut: {} -> {}".format(cut, nextCut))
# make sure we don't cut words in half
if nextCut == len(text) or text[nextCut] == " ":
print("may cut")
else:
print("may not cut")
while text[nextCut] != " ":
nextCut += 1
print("new cut: {}".format(nextCut))
line = text[cut:nextCut].strip()
# is line still fitting ?
w, h = draw.textsize(line, font)
if not isLast and w > img.width:
print("overshot")
nextCut -= 1
while text[nextCut] != " ":
nextCut -= 1
print("new cut: {}".format(nextCut))
lastCut = nextCut
lines.append(text[cut:nextCut].strip())
else:
lines.append(text)
print(lines)
lastY = -h
if pos == "bottom":
lastY = img.height - h * (lineCount+1) - 10
for i in range(0, lineCount):
w, h = draw.textsize(lines[i], font)
x = img.width/2 - w/2
y = lastY + h
drawTextWithOutline(lines[i], x, y)
lastY = y
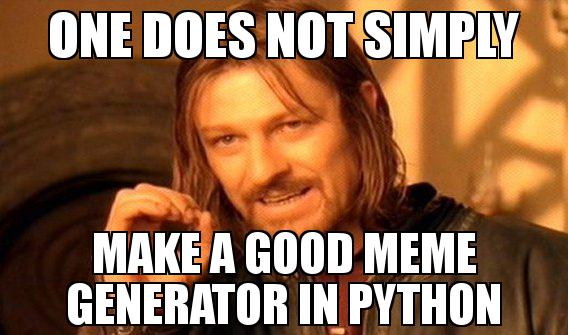
drawText("One does not simply", "top")
drawText("make memes great again with several lines", "bottom")
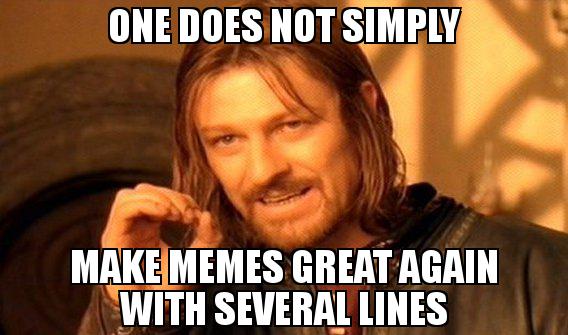
And there you have it !
You can find all the above examples in full in this Github repo: https://github.com/lipsumar/meme-caption, along with a command line version (meme.py).
Note that meme.py is a bit uglier than the rest, but it has one improvement: reduce the font size if the text is too long. Sorry about that.
Comments